Things You'll Need
Tin shed or shelter
4-by-4 inch posts (at least 6)
Cement (optional)
1-by-6 inch boards
Hammer and nails or a nail gun
2-by-4 inch welded wire
Staple gun
2-inch nylon flight netting
1-inch poultry netting
Tips
Peafowl can typically withstand cold temperatures, but it is recommended that you provide heated shelter for them during the winter, especially in the northern states.
Take extra precautions against predators in areas where dogs and foxes are known to live by using small-gauge netting and by burying the netting to prevent predators from digging into the cage.
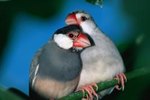
Raising peafowl is a challenging yet rewarding experience. These fowl are known for being very hardy birds that do well in a wide range of temperatures. Given adequate space, shelter and roosting places, peafowl can thrive on a farm. To ensure that your peafowl remain happy and healthy, it is important that you provide them with a pen or cage that suits their needs. Peafowl require adequate space, roosting places and protection from predators. If you are able to build a pen that meets these needs, you are likely to be successful in raising peafowl.
Erect a tin shed or shelter, or make use of one already standing in your yard, and position it so that the opening faces south. If you have a barn or garage, it is wise to build your peafowl cage using the wall of the barn as a windbreak on one side. If you do not have a barn, however, it is possible to build a free-standing peafowl pen.
Map out the shape of the pen by laying string on the ground to mark the borders of the pen. The optimal dimensions for a peafowl pen are 12-by-24 feet.
Dig holes in each of the four corners of the pen deep enough to bury the 4-by-4 posts to a depth of at least 12 inches, leaving the exposed post at least 6 to 8 feet in height. Dig more holes to bury additional 4-by-4's to provide extra support for the frame. How many extra 4-by-4 posts you use is your choice, but they should be placed at least every 8 to 12 feet along the frame.
Insert the 4-by-4 posts into the holes dug in the ground and secure them in place by either filling the hole with cement or by hard packing the earth around the post.
Lay out and attach the top and bottom frames of the pen. Using 1-by-6 inch boards, create a border around the bottom of the pen by laying the boards on the ground and nailing them to the 4-by-4 posts using a hammer and nails, or a nail gun. For the bottom frame, lay the boards down with the narrow edge on the ground. For the top frame, lay the boards flat and nail them to the tops of the 4-by-4 posts, creating a framework for the roofing to be attached.
Enclose the pen using 2-by-4 inch wire, wrapping it all the way around the frame of the pen. If your tin shed is as wide as the pen, you do not need to enclose that side with wire. If you are using a barn or garage as one wall of the pen, it is not necessary to cover that side with wire. Secure the wire to the 4-by-4 inch posts and to the top and bottom 1-by-6 inch boards using a staple gun.
Wrap 1-inch poultry netting around the bottom two or three feet of the frame of the pen, outside the wire. The netting will help to prevent small predators from entering the pen and will also keep your peafowl from sticking their necks through the wire and injuring themselves.
Cover the top of the pen with 2-inch nylon flight netting, securing the edges of the netting to the flat 1-by-6 inch boards with nails, or the staple gun.
Install roosts in the pen by nailing 2-by-4 inch boards to the 4-by-4 posts at varying heights around the pen.
References
Tips
- Peafowl can typically withstand cold temperatures, but it is recommended that you provide heated shelter for them during the winter, especially in the northern states.
- Take extra precautions against predators in areas where dogs and foxes are known to live by using small-gauge netting and by burying the netting to prevent predators from digging into the cage.
Photo Credits
-
Jupiterimages/Photos.com/Getty Images
Writer Bio
Katherine Barrington has written on a variety of topics, from arts and crafts to pets, health and do-it-yourself projects. She has a Bachelor of Arts in English with a creative writing concentration from Marietta College.