Things You'll Need
liquid acrylic cement
spare tank
water hose
needled syringe
face mask
towel
Aquarium cracks, chips or leaks happen more often to glass aquariums rather than acrylic aquariums. Acrylic aquariums are often advertised as lightweight and crack and leak resistant. They cost more than glass aquariums as they offer benefits that glass aquariums can't offer. Acrylic aquariums have more clarity than glass, are lightweight and are stronger. If you do experience a leak or crack in an acrylic aquarium, there are ways it can be fixed.
Choose which type of acrylic glue you need. There are two different kinds of acrylic glue, one being a thin liquid glue and the other a thick glue. A popular brand for acrylic tank repair is WeldOn. You can find this at a pet store and at some hardware stores.
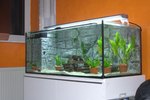
Empty your tank of all fish, water and gravel so that is is completely empty. Move the tank outside so you can use a water hose to remove any sand, gravel or buildup that remains in your tank so it can be as clean as possible.
Use a towel to dry your tank thoroughly and allow it to air dry so all seams and areas can dry completely. Bring the tank back inside and prepare an area to work in. Protect your table by covering it with newspaper or plastic.
Prepare the area you will be repairing. Use isopropyl alcohol to remove any oils from the hands. For acrylic that has a small crack, but is still tightly joined, use a liquid glue such as WeldOn 3. For larger cracks that exhibit more separation, use a thicker glue like WeldOn 16.
Put on your face mask so you don't breathe the fumes made by the glue. Fill the syringe with the glue. For minimal cracks and liquid acrylic use, use a thin wire to spread the crack. Insert the needle into the crack and inject the acrylic glue into the crack. Allow the glue to sit for 30 to 60 seconds. Place the tank on its side, choosing an adequate position depending on the location of the crack.
Apply weight to the top side of the tank that is sufficient enough to press the crack together. Allow it to sit until it dries. You can apply weight with any heavy object that will press the crack together tightly. Letting it sit overnight will ensure that it dries completely.
Apply the glue to one side of the crack if you are using the thicker glue for larger cracks or separations. Press the joined pieces of acrylic firmly together then allow it to sit for two to four minutes. Place the tank on its side and apply weight to compress the crack. Allow to the tank sit overnight to ensure it has dried.
Tips
If you have a deep, large crack, that goes all the way through the thickness of the acrylic, you may need to replace your tank.
Using a Microfiber towel to wipe down the tank after rinsing it out prevents the acrylic from getting scratched.
If WeldOn 16 doesn't work for your larger cracks, WeldOn 40 can possibly work as it is also a thick glue for acrylic repair.
Warnings
Do not wash your tank with any chemicals because they can leave residue harmful to fish.